Channels is the tool that, just like Groups, allows gathering all publisher ad spaces sharing the same attribute. But unlike a group, a channel allows you to change the existing rewards or hold time for channel members only. For example, you can set an increased reward or shorter hold time for channel members.
You can also create a link with special UTM tags by which you can track and analyze channel members' traffic.
What makes this tool special is that one ad space of a publisher can only be a member of one channel. This restriction doesn't apply to groups.
Purpose of channels
The channels help:
- Add tags to monitor ad space traffic of a particular publisher or a group of publishers.
- Set special reward or hold time terms. For instance, you can create a special channel "VIP reward" for major ad spaces, which will feature an increased rated, shorter hold time, and a special tag for traffic.
- Target banners and coupons.
How to create a channel
You can create a channel:
- On your own
-
Through an account manager, having provided them with the necessary information about the channel.
How to create a channel through a manager
Provide the manager with the following information:
-
Channel purpose. Describe the ad spaces you will add to your channel and how you will select them.
-
List of UTM tags and their values. Specify the tags and values if you need to create a special link for the channel members.
It's recommended that you only use the tags that your standard affiliate link doesn't contain. Otherwise, your older tags will be replaced with channel tags—leading to you losing some information about traffic.
-
Participation in the bonus program. Specify whether the ad spaces in the channel can participate in the bonus program.
- Cookie lifetime. Specify whether you need to set a special cookie lifetime for channel members. If this special parameter is needed, specify the number of days.
The manager will add the channel, after which it will show up in the general list in Channels.
Now you can:
- Add publisher ad spaces to the channel. Follow this guide.
- Change rewards in the channel. Follow this guide.
- Manage the channel. Follow this guide.
How to create a channel
1. Go to Channels (Publishers → Promotion → Channels) and click Add new channel.
2. Fill out the following fields:
-
Name. Specify the name that will translate the purpose of your channel.
-
Type. Select Standard.
-
Status. Select Active to enable the channel right away. You can't add publishers to inactive channels.
-
Link. There are two options:
-
Leave the field empty if you need the links to be the same for channel members and other publishers.
-
If you need the channel link to replace all other links (standard, coupon, and banner links), insert the full link into this field.
Example:
https://website.ru/?utm_source=admitad&utm_medium=cpa&utm_campaign=cosmo_sale&webid={{publisher_id}}&admitad_uid={{admitad_uid}}Since this replacement often causes inconveniences for publishers, this method is rarely used. The scheme option is way more common.
-
-
Scheme. There are two options:
- Leave the field empty if you need the links to be the same for channel members and other publishers.
- If you need to mark channel member traffic with special GET parameters, specify them in this field, starting with a "?".
Example:
?utm_source=admitad&uid={{admitad_uid}}&subid={{subid}}
This "tail" will be automatically added to the links that channel members use.
Important:
- Only add the tags that your standard affiliate link doesn't contain. Otherwise, your older tags will be replaced with channel tags—leading to you losing some information about traffic.
- The channel scheme is always a priority for any link. So if any of the GET parameters exists both in the channel scheme and the link (e.g. a landing page link), the parameter in the link will be replaced with the channel scheme parameter.
- Leave the field empty if you need the links to be the same for channel members and other publishers.
-
Apply the scheme to all types of links. By default, the scheme only applies to standard links and deeplinks. Check this box if you need to add the parameters to all links (coupon, landing page, and banner links, etc.).
-
PostView link. Leave this field empty.
-
Cookie lifetime. If you want to set a special cookie lifetime for channel members (which will differ from cookie lifetime in the program settings), specify that special cookie lifetime in this field.
- Participation in the bonus program. Check this box if the ad spaces in the channel must be able to participate in the bonus program.
3. Click Save.
The channel will appear in the general list in Channels.
Now you can:
- Add publisher ad spaces to the channel. Follow this guide.
- Change rewards in the channel. Follow this guide.
- Manage the channel. Follow this guide.
How to add or change a reward for a channel
Among other functions, a channel allows to add a special rate that will only work for its members.
You can add or change a rate:
- By yourself if you have the appropriate authorities in your account.
-
Through a manager, having provided them with the rate info.
How to change a rate through a manager
Follow these steps:
1. Provide the manage with the following details: which rates and rewards must work for publishers in this channel, and how long.
Read this text to learn about setup options.
2. The manager will set the rates and notify you when done.
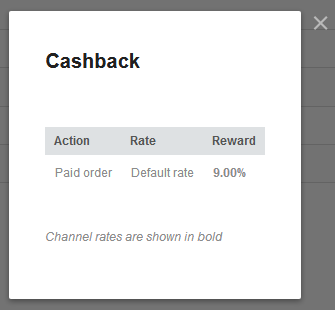
To check which rates are no effective in the channel, click 
You will see the window where all actions, rates, and rewards for a particular channel will be shown.
- Exclusive rates, which only apply to a specific channel, appear in bold type.
- If a channel doesn't have any special rewards, standard program rewards for it are specified in normal type.
How you change a rate on your own
You can only add or change a rate if your program is currently inactive or being tested. If the program is already active, only the manager can add or change a rate.
1. Click 
2. Click Edit next to the action in Actions at the bottom of the page.
3. Click Edit right to the rate in Rates.
4. Change the rate settings following this guide.
5. Save the changes.
Follow this guide to add a new rate.
How to add ad spaces to a channel
You can add ad spaces to a channel:
How you add ad spaces on your own
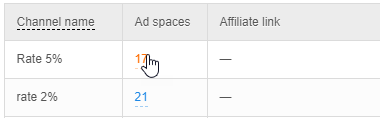
You can only add channel members having activated the channel (click 
In this case, the number in the Ad space column will become clickable. Click on it.
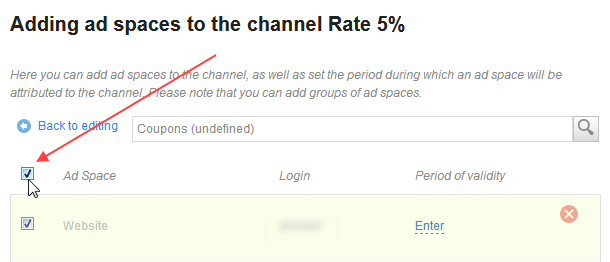
You can add ad spaces one by one or move a group of ad spaces to a channel at a time (if you have active groups). For that, click Add new ad space and start typing the ad space name or URL, or the publisher username. Pick the result from the dropdown list.
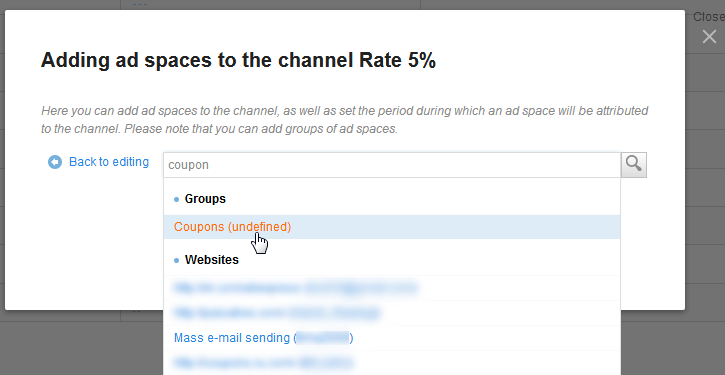
When adding a group to a channel, you don't have to move all ad spaces in a group: You can select some of them.
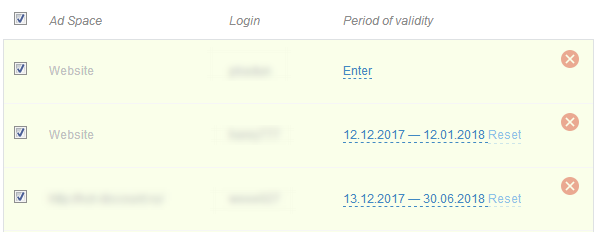
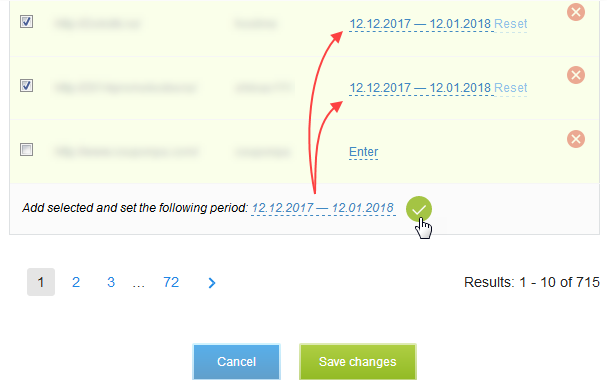
Check ad spaces you want to move and save the changes. The selected ad spaces will be added to the channel for an unlimited time.
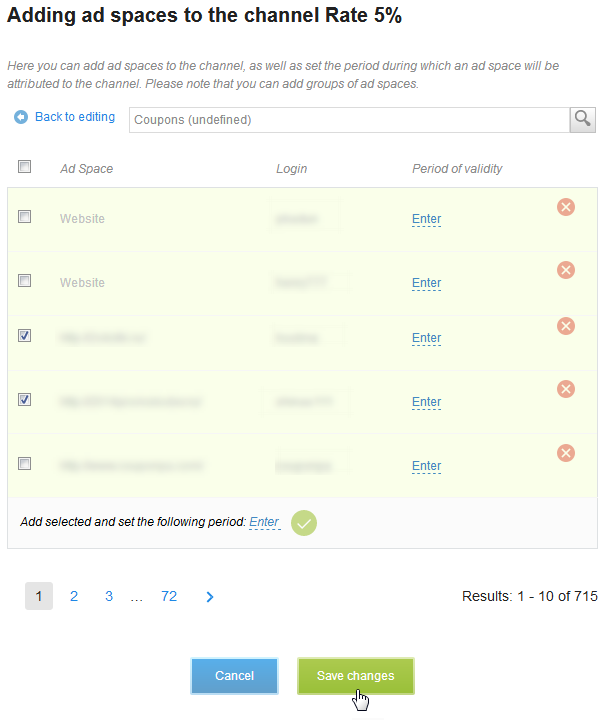
If you want to move all ad spaces in a group to a channel, select all ad spaces (by checking the Ad space field) and click Save changes.
You can add ad spaces to a channel either for an unlimited time or for a specific period. In the latter case, specify the period during which the selected ad spaces will stay in the channel. You can specify a different period for each ad space (click Specify next to an ad space).
Or you can set a period for all the selected ad spaces.
If you disable a channel, all the added ad spaces will be deleted. They will not be restored if you reactivate your channel: You will have to add them again.
You can also set up automatic distribution of ad spaces to channels.
Auto-distribution
To set up the auto-distribution of ad spaces, create and activate the channels beforehand.
It's the manager who sets up auto-distribution in General settings (Program settings → General settings).
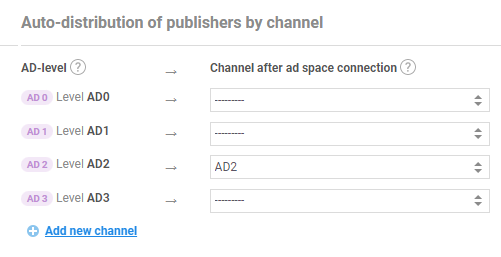
When auto-distribution is enabled, you can distribute ad spaces with particular account levels between channels.
Auto-distribution is rarely used, since the only filter available is the filter by publisher account level. Manual distribution of publishers between channels is way more convenient and accurate, though more time-consuming.
How to manage channels
If you are not authorized to disable or delete channels, contact the account manager.
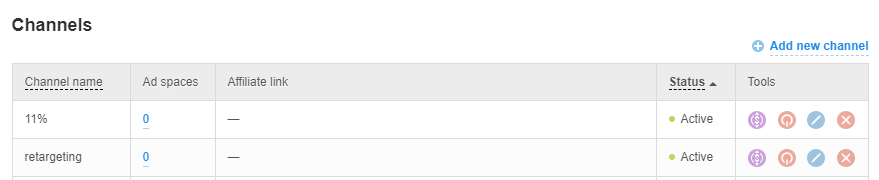
The Tools column contains buttons using which you can manage channels.
-
-
-
-
— disable channel
-
— delete channel
If you disable or delete a channel, all its members will be deleted, channel links will be replaced with standard links, and publisher rewards will be calculated at a standard rate. If you want to reactivate a disabled channel, you will need to set it up over again.
Channel reports
Go to the Reports on channels section to see channel performance details. Learn more