To be integrated with Admitad, your application must be integrated with the Branch SDK. Learn more
If you have a mobile app, your manager will suggest that you activate mobile tracking for your affiliate program when you join the Admitad Partner Network.
Integrating a mobile app with Admitad includes three key steps:
- Integrating the app with Branch
- Setting up integration on Admitad's end
- Setting up integration with Admitad on the mobile platform
Step 1. Integrating the app with Branch
Integrate your app with Branch
If you haven't integrated with Branch yet, follow the instructions on Branch's website:
Set up sending target events from your app to the mobile tracker
The events in the app allow you to evaluate user engagement based on their behavior. Such events may include clicks on links, downloads, impressions, purchases, etc. Mobile tracking services help set up the events that the app will track.
Step 2. Setting up integration on Admitad's end
The process of setting up integration in your Admitad account includes the following steps:
Select the tracking type in the program
In your Admitad account, choose the action tracking type:
- Browser
- Mobile app
- Browser and mobile app
- Go to your Admitad account → Profile.
- Select General settings.
- Proceed to Tracking and transition settings.
- In the Type of mobile tracking field, select Branch.
- In the Tracking action from field, select the tracking type from the dropdown list.
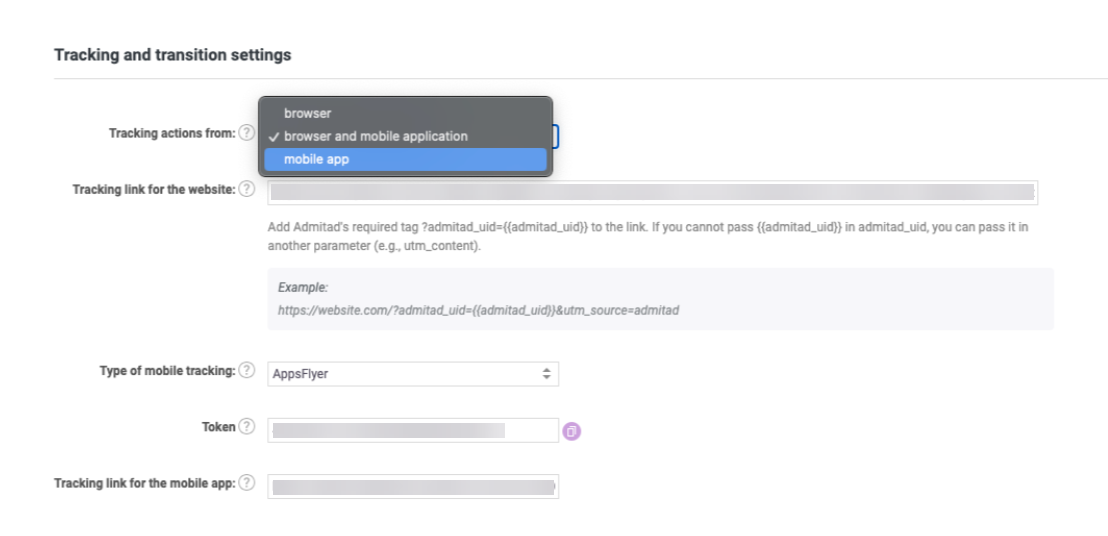
If you chose Browser and mobile application, copy the link from the Tracking link for the website field and paste it into the Tracking link for the mobile app field. It will then be replaced with another one.
Set up the target action in your Admitad account
You can now create a mobile action with the necessary in-app events:
- In your Admitad account, go to Program - Actions and rewards - New.
- Fill out the following fields:
- Name. A descriptive name of the action that the publisher will see. The action name should be concise and easy to understand because it's shown in All Programs and on the program page (e.g., Purchase, Paid order, Request, etc.).
- Channel. Leave this field empty.
- Action from. Select the mobile tracker through which integration is configured.
- InApp event. Select an option that seems most relevant to the target action.
- Hold period. The period during which the actions should be processed. The standard value is 30 days.
- Status. Select the status. If you want the action to take effect immediately, select Active. Otherwise, leave it inactive.
- Vendor action. Leave this field empty.
- System's fee. Leave this field empty.
- System fee as a percentage of the total amount. Leave this field empty.
-
Commission. Set the type and amount of the reward.
- Fixed — publishers will receive a fixed amount, regardless of the order amount.
- Percentage — publishers will receive a percentage of the order amount.
- Click Create.
Step 3. Setting up integration with Admitad on the mobile platform
The process of setting up integration in Branch includes the following steps:
- Add Admitad as a partner in the tracker
- Set up attribution
- Set up postback requests
- Add a tracking link to Admitad
- Test the integration
Add Admitad as a partner in the tracker
Here's a detailed guide on how to add Admitad as a partner on the Branch website:
Adding Admitad as a partner in Branch
According to Branch's rules, after you add "AdmitAd" as a partner, Branch will send a message to inter@admitad.com in which it will invite Admitad to cooperate. Accept the invitation.
After you add "AdmitAd" as a partner, you will need to enter the Postback Key, which you can find in your Admitad account.
Set up attribution
Attribution allows you to distribute the value between traffic sources that generated a conversion. In other words, this is a way to track the user's path from the first click to the target action. The attribution settings will determine whether the publisher receives their reward based on user behavior and how the user interacts with traffic sources. Learn more about attribution methods and setup on the mobile tracker website:
How to set up attribution in Branch (ENG)
Set up postback requests
Postback is a tool that notifies the partner when the user completes a target action (e.g., installs an application through their ads). Usually, HTTP requests are used for notifications.
Branch has pre-set postback request templates for Admitad. But after you add one, check the "&tracking=" parameter. The parameter value must match the name of the in-app event displayed in your Admitad account. If necessary, change the value of the "&tracking=" parameter. Otherwise, transactions will not be registered in Admitad reports.
Please pay attention to the value passed in the "&oid=" parameter. Admitad registers this request parameter's value as the "order number."
Setting up postback in Branch (ENG)
Add a tracking link to your Admitad account
To enable Admitad to track user activity in your app, provide us with a tracking link. You can set up and get this link in the selected mobile tracking service.
Please note that in some services, link configuration depends on how many platforms (Android, iOS) your app runs on. You can only set one link for a mobile app in Admitad, so use one link from the mobile tracker for both operating systems (Android and iOS).
You can find a detailed guide on setting up a tracking link in Branch on the service website. Please note that the guide is only available in English.
How to set up a tracking link in Branch
How to set up a tracking link in Branch
- On the Partner Management page, click Create Admitad Link to generate a transition link. The following window will appear:
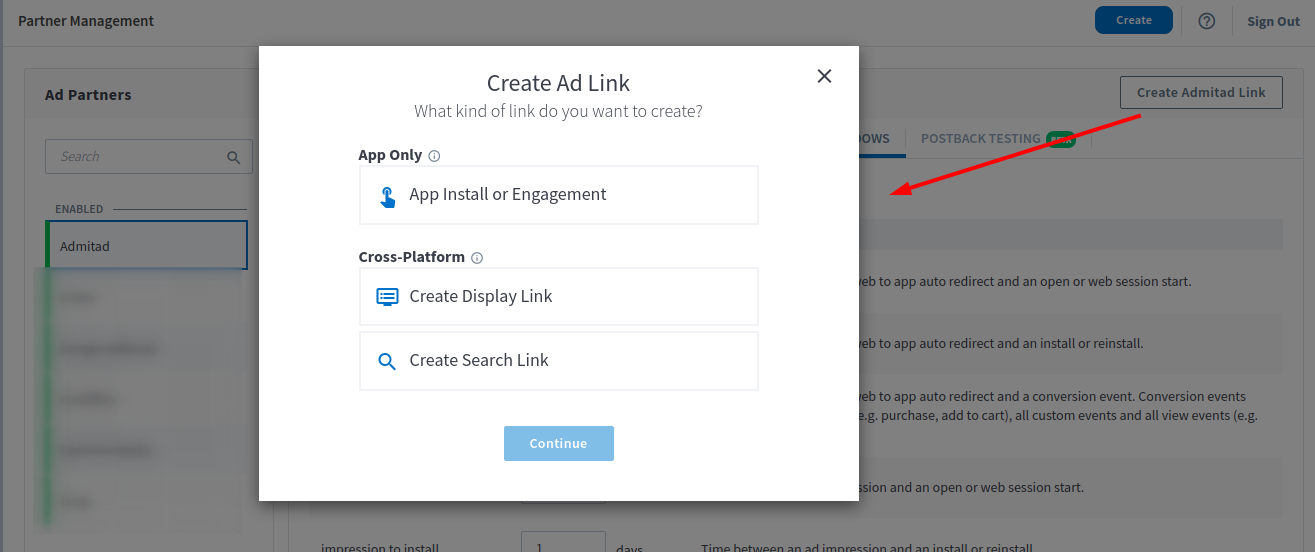
- Select App Install or Engagement. This means the app will be installed if it's missing on the device.
- Refer to this page to view how redirects occur, depending on the operating system and the presence or absence of the app, for the selected Branch affiliate program.
- Click Continue to go to the next section: Define. In this section:
- Enter the link name (e.g. Main Link) in the Name your link field.
- Make sure the Which Ad Partner is this for? field has "Admitad" in it.
- Make sure the correct link type is selected in the What ad format are you using? field.
- To edit a field, click Edit:
- Click on Configure Options to switch to the next section.
- Go to the REDIRECTS tab and make sure the redirects are configured correctly for when the app isn't installed.
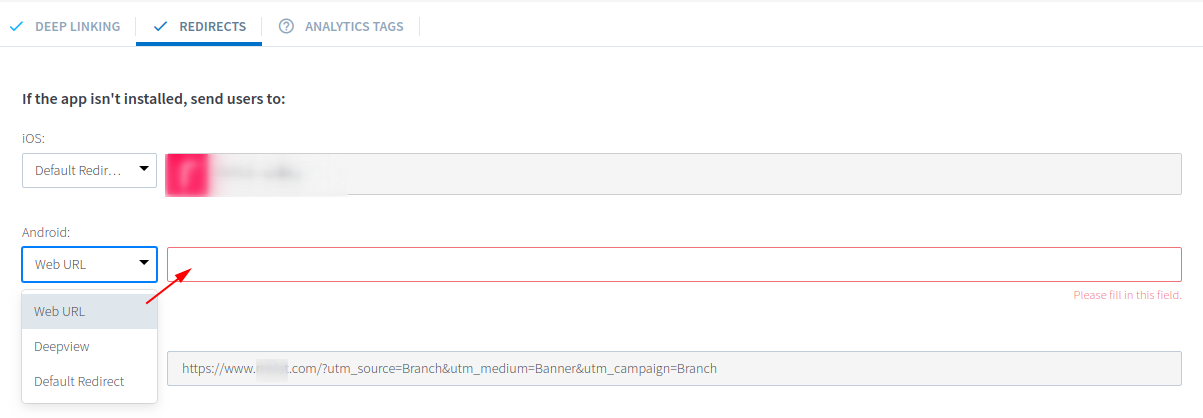
Save the link by selecting Create Link Now.
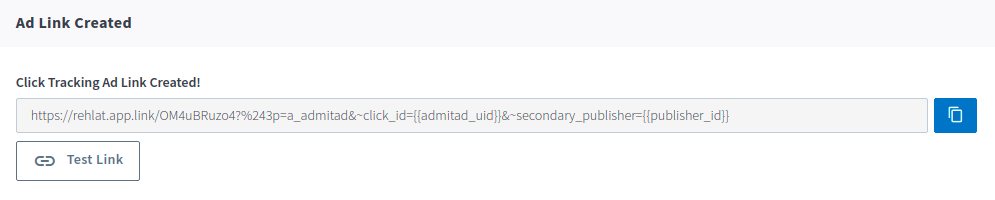
Use the link from the Click Tracking Ad Link Created! field as a tracking link for the affiliate program's mobile app. The parameters that we need (publisher's UID and ID) will be added by default:
Test the integration
To check if the integration settings are correct, you might want to test everything before launching the advertising campaign. Learn more about testing methods for every service: